
Two-minute version
- In your custom module, define a plugin with the
EmailBuilderannotation. - Define the email types and sub-types your module wants to expose.
- Include a
symfony_mailer.mailer_policy.TYPE.SUB-TYPE.ymlin your module to provide default email content. - Use the
email_factoryservice to build and send emails. - See the source code for the examples used in this article.
Objectives
Say, you have a Drupal website where users can log into their accounts. For security reasons, you’ve decided to send an email notification to users on the following events:
- When they log into their account.
- When they log out of their account.
In this article, we’ll write code to achieve the abovementioned email notifications.
Getting started
At the time of writing this article, the Drupal + Symfony Mailer integration is provided by the Drupal Symfony Mailer module. You’ll need to install this module (using Composer) if you want to use Drupal’s new Email API.
Additionally, you’ll need to create a custom module that will contain the code for sending emails. In our example, I’ve called the module custom_email_example.
Step 1: Create an Email Builder
The job of hook_mail() is now done by an Email Builder class. It simply declares a list of email types and sub-types that the module wants to define. This is done by defining a plugin with the @EmailBuilder annotation.
namespace Drupal\custom_email_example\Plugin\EmailBuilder;

/**
 * Email Builder plug-in for the custom_email_example module.
 *
 * @EmailBuilder(
 *   id = "custom_email_example",
 *   sub_types = {
 *     "login" = @Translation("Login notification"),
 *     "logout" = @Translation("Logout notification"),
 *   },
 *   common_adjusters = {"email_subject", "email_body"},
 * )
 */
class ExampleEmailBuilder extends EmailBuilderBase { ... }
A noteworthy method in this class is ::build(). It can modify the Email object when it is being built. It can set default parameters and variables which will be available in the email subject, body, etc.
# In the class ExampleEmailBuilder.
public function build(EmailInterface $email) {
  $email->setFrom('noreply@jigarius.com');
  $email->setVariable('ip', $_SERVER['REMOTE_ADDR']);
}
These variables can then be used in the email subject and body, e.g. {{ ip }}.
Step 2: Provide default policies
The EmailBuilder merely prepares some metadata for the email; it usually doesn’t provide the content. It is important to note that the email content, e.g. subject and body, are usually translatable.
In the old hook_mail() approach, one would either hard-code the email content or go through a tedious process of providing a configuration UI so that administrators can modify the email content. In the Symfony Mailer approach, email content is managed via mailer policies. Such policies are a part of Drupal’s configuration, hence, they can be overridden and translated (using configuration translation).
In our example, I created the default subject and body for the email notifications, exported the config, and included it in my module’s config/install directory. Here's an example of a policy that defines a subject and a body.
# symfony_mailer.mailer_policy.custom_email_example.login.yml
# ...
id: custom_email_example.login
configuration:
email_body:
content:
value: |-
<h4>Logged in</h4>
<p>Hello user.</p>
<p>This is to notify you that you have logged into your account on <a href="[site:url]">[site:name]</a> from the IP Address <strong>{{ ip }}</strong>.</p>
<p>Regards.</p>
format: email_html
email_subject:
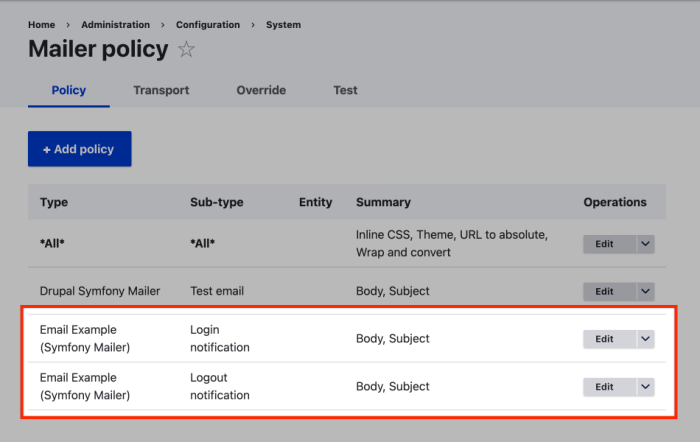
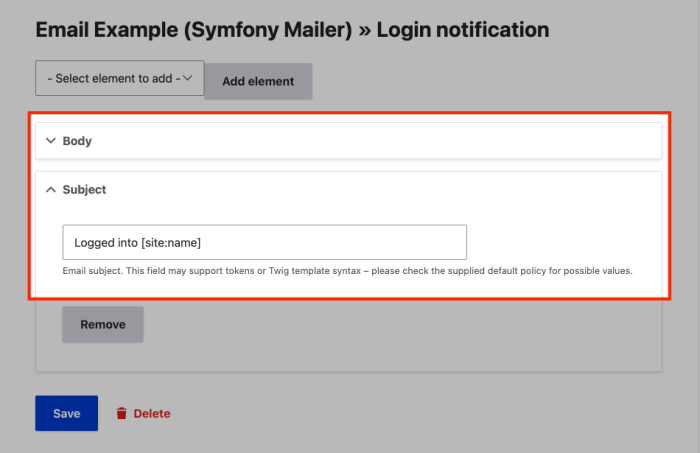
value: 'Logged into [site:name]'Notice that the email body or content supports some standard tokens and the variables that we pass in through ::setVariable() in the Email Builder class. This can then be edited by administrators from the Configuration > System > Mailer page. The policies must be enabled for them to have effect.
Step 3: Send emails
At this point, the heavy-lifting is done! Cool! Now all that’s missing is the code that will send the email messages. This API works for now, but there is an ongoing discussion about changing it.
$emailFactory = \Drupal::service('email_factory');
$emailFactory->sendTypedEmail('custom_email_example', 'login', $account->getEmail());
In case you want to send a more complex email with custom parameters and variables, you’ll need to do a little more work. The fun part is that the code is very object-oriented.
use Drupal\symfony_mailer\Address as EmailAddress;

$email = $emailFactory->newTypedEmail('custom_email_example', 'logout')
    ->setTo($account->getEmail())
    ->setCc(new EmailAddress('r2d2@example.com', 'R2D2'))
    // This will be available as a Twig variable in the email body.
    ->setVariable('account', $account);

$email->send();
Here is a screenshot of test emails that I received in my Mailpit inbox while preparing this tutorial. Mailpit is a utility similar to Mailhog; it catches emails sent from your local Ddev environment.

Conclusion
As Drupal continues to modernize its APIs and move more and more towards OOP, new versions of doing things keep emerging. Since Drupal relies heavily on Symfony, it is no surprise that using Symfony Mailer to send emails is a natural and welcomed upgrade.
Using the new Email API allows module developers to use an object-oriented, plugin-powered approach for sending emails. At the same, it allows administrators to easily configure and translate the email content and many other parameters through the administration interface.
Next steps
- See the source code for the examples used in this article.
- Read about hook_mail() and friends.
- Read about the Symfony Mailer module.
- Read about the Queue Mail module.


